Custom Native Modules with React Native & Expo - Part Two

In Part 1 of this two-part series on Expo config plugins, we set up a config plugin and configured it to work on iOS.
In this second part we will be writing a config plugin for Android, including the addition of native Java code and the resultant integration with the React Native project.
Continuing Our Calendar Module
To recap where we left off in Part 1, we were creating the simple Calendar module described in the React Native docs. Where our example differs is that we need to make it work on an Expo project in the managed workflow.
Let's resume and start looking at the Android side.
Configuring the Android Calendar Module
The first part of the Android setup will be very similar to what we saw previously on iOS. Again, the implementation of the native code itself is not our main concern, so we'll simply be taking the Java code from the React Native documentation.
First, let's get the new native files created:
mkdir -p ./plugins/native/android

touch ./plugins/native/android/CalendarPackage.java
touch ./plugins/native/android/CalendarModule.java
The CalendarModule will contain the specific functionality and the CalendarPackage bundles that into a package which can be added to the list of packages registered as native modules in the React Native project.
// CalendarModule.java
package com.your-project-name; // Replace with real name
import android.util.Log;

import com.facebook.react.bridge.ReactApplicationContext;
import com.facebook.react.bridge.ReactContextBaseJavaModule;
import com.facebook.react.bridge.ReactMethod;
import com.facebook.react.bridge.Callback;

@Override
public String getName() {
   return "CalendarModule";
}

@ReactMethod
public void createCalendarEvent(String name, String location, Callback callback) {
   Log.d("CalendarModule", "Create event called with name: " + name
   + " and location: " + location);
   callback.invoke("random-event-id-123");
}
// CalendarPackage.java
package com.your-project-name; // Replace with your project's real name
import com.facebook.react.ReactPackage;
import com.facebook.react.bridge.NativeModule;
import com.facebook.react.bridge.ReactApplicationContext;
import com.facebook.react.uimanager.ViewManager;

import java.util.ArrayList;
import java.util.Collections;
import java.util.List;

public class MyAppPackage implements ReactPackage {

   @Override
   public List<ViewManager> createViewManagers(ReactApplicationContext reactContext) {
       return Collections.emptyList();
   }

   @Override
   public List<NativeModule> createNativeModules(
           ReactApplicationContext reactContext) {
       List<NativeModule> modules = new ArrayList<>();

       modules.add(new CalendarModule(reactContext));

       return modules;
   }

}
Now that we've added the Java files, we can revisit with-android-calendar.js, where we'll be adding the logic to connect our new Android native module to the React Native project.
// with-android-calendar.js

/* eslint-disable no-param-reassign */
const { withMainApplication } = require("@expo/config-plugins");
const fs = require("fs");

/** Relative to root of our project */
const ANDROID_NATIVE_CODE_PATH = "./plugins/native/android";

const ANDROID_FILES = ["CalendarModule.java", "CalendarPackage.java"];

/** Custom config plugin adding a native Android calendar module */
const withAndroidCalendar = (config) => {
  config = withMainApplication(config, (config) => {
    const { modResults } = config;
    const { path, contents: mainApplicationCode } = modResults;
    const addNativeModuleAt = path.replace(/\/MainApplication.java/, "");

    /** Physically copy Android .java files to android folder. */
    ANDROID_FILES.forEach((fileName) => {
      fs.copyFileSync(
        `${ANDROID_NATIVE_CODE_PATH}/${fileName}`,
        `${addNativeModuleAt}/${fileName}`
      );
    });

    config.modResults.contents = registerCalendarPackage(mainApplicationCode);

    return config;
  });
  return config;
};

/** Register CalendarPackage with Android package list */
const registerCalendarPackage = (mainApplicationCodeAsString) => {
  const codeToAddCalendarPackage = `packages.add(new CalendarPackage());`;

  if (!mainApplicationCodeAsString.includes(codeToAddCalendarPackage)) {
    mainApplicationCodeAsString = mainApplicationCodeAsString.replace(
      /return packages;/,
      `
        ${codeToAddCalendarPackage}
        return packages;
        `
    );
  }

  return mainApplicationCodeAsString;
};

module.exports = withAndroidCalendar;
Again, the Android implementation mirrors the iOS to a degree. As before, we physically copy the native Java files into the directory where React Native needs them.
Where the Android side differs is that we also need to add the Calendar package to the list of Java packages using the registerCalendarPackage method which accesses the MainApplication.java source code using the withMainApplication config plugin which ships with the @expo/config-plugins module.
Once again, we can run expo prebuild to verify that everything is working as expected.
With the iOS and Android implementations all finished, we can now set about writing some React Native code and test out the calendar module.
Expose the Native Module to React
Let's recap where we've got to.
We added the iOS and Android native code and rewrote the platform-specific config plugins to make sure the Objective-C and Java files were properly accessible to our React Native project.
What we now need is for React Native to be able to load in our native module and use it on the JavaScript side. First, let's create a new file called Calendar.js.
touch Calendar.js
Now let's configure this file to load the calendar module and export it:
// Calendar.js

import { NativeModules } from "react-native";

const { CalendarModule } = NativeModules;

export default CalendarModule;
We are now easily able to access the calendar module, so let's test it out by adding a basic button to trigger its createCalendarEvent method.
Using the Calender Module
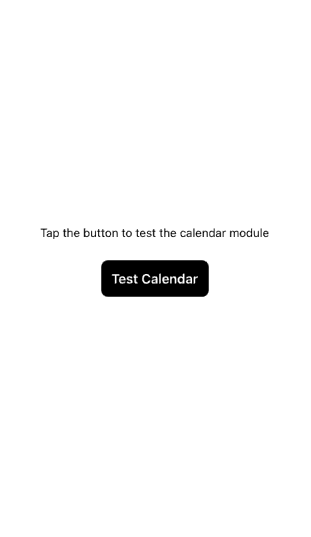
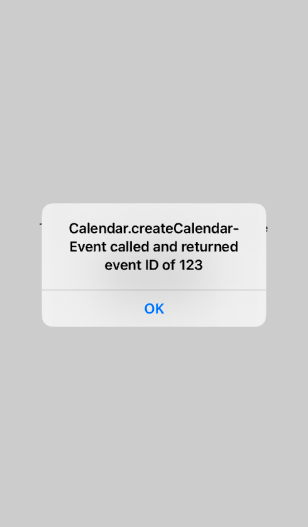
Let's now modify App.js to add a simple button which, when pressed, invokes the createCalendarEvent method and displays the eventId in a simple alert.
// App.js
import { StatusBar } from 'expo-status-bar';
import { StyleSheet, Alert, Text, TouchableOpacity, View } from 'react-native';

import Calendar from './Calendar';

export default function App() {
  return (
    <View style={styles.container}>
      <Text>Tap the button to test the calendar module</Text>
      <TouchableOpacity
        style={styles.btn}
        onPress={() => {
          Calendar.createCalendarEvent("Birthday Party", "My House", (err, eventId) => {
            if (!err) {
              Alert.alert(`Calendar.createCalendarEvent called and returned event ID of ${eventId}`);
            }
        })
        }}>
        <Text style={styles.btnText}>Test Calendar</Text>
      </TouchableOpacity>
      <StatusBar style="auto" />
    </View>
  );
}

const styles = StyleSheet.create({
  container: {
    flex: 1,
    backgroundColor: '#fff',
    alignItems: 'center',
    justifyContent: 'center',
  },
  btn: {
    marginTop: 24,
    padding: 12,
    borderRadius: 8,
    backgroundColor: '#000',
  },
  btnText: {
    fontSize: 16,
    lineHeight: 20,
    fontWeight: '600',
    color: '#fff'
  }
});
We can now run the project on an iOS simulator
expo run:ios
Cnce the project is running on the simulator, clicking the button should trigger a native method invocation and display the alert.


Summary
In this article we have looked at how custom Expo config plugins can let you add your own custom native code in the Expo managed workflow.
By using an example straight from the React Native docs and linking the module to the Expo project, we have seen how far Expo has come in terms of mimicking the functionality available in projects created through the React Native CLI.
For use in production with a more complex module, it would probably be better to create a separate repository and load that into your project. Indeed, this seems to be the approach recommended by Expo, but hopefully this article has given some good pointers on how to get started with writing your own config plugins.
Thanks for reading!
Related Articles
Native Modules with Expo Config Plugins: Part 1
Expo is a popular toolchain for React Native which simplifies the…
May 11th, 2022
Querying Firebase Analytics Data
When getting started with Firebase Analytics, it can be confusing to figure…
March 23rd, 2022
Comparing Next.js and Gatsby's Handling of Data
Next.js and Gatsby are modern frontend frameworks based on React. Typically…
February 8th, 2022


